

Bicycle Frame Preparation:
Tapping, Facing and Aligning a Fine Bicycle Frame Explained
As soon as we imported our first Italian frames back in the early 1980s we realized we would have to give them a thorough prep and alignment. Here's the step-by-step process we took to getting a fine steel bicycle frame ready to assemble. —Bill and Carol

Les Woodland's book Tour of Flanders: The Inside Story - The rocky roads of the Ronde van Vlaanderen is available as an audiobook here. For the print and Kindle eBook versions, just click on the Amazon link on the right.
Our story:
Frame Preparation
All frames we sold received a thorough preparation and alignment. There was only one level of attention given to a frame. The least expensive frame got the same care as a Mondonico EL-OS. This was in keeping with our philosophy of making every bike a fine as it could be, because every one of our bikes was going to be someone's dream bike.
Our framebuilders lavished care and love on the frames they built. After brazing, the builder would get out the files and emery cloth to make sure the final finished bicycle was as beautiful as it is fast. When the builder is satisfied that his frame is ready for chroming and/or painting, he sends the frame on its way. None of our builders did his own painting and chroming. Frames were sent out to others who specialize in finishing bicycle frames. Most of our frames were painted in the United States because it was very difficult to find painters in Europe who could work to our standards.
After chroming and painting the frame and before the first parts of the gruppo get bolted on, there is still work to do to. We had to make sure the bike would assemble easily and ride true and straight. This work is called Frame Preparation. Sometimes mechanics refer to it as "frame prep" or just "prep." This might be done by the builder, the importer, or the bike shop. It doesn't matter who does it, just that someone does it. For our frames, this was all done in our Camarillo warehouse in order to maintain the necessary quality control. In fact, we asked our builders not do the work, so that it is done once, and done correctly.
Most of what follows is intended for our fine steel frames, but the general rules of tapping, facing, and alignment are applicable to all bicycles.
We divided our work into two phases.
- Tapping and facing
- Aligning
Tapping and facing
This is best done using precise hand tools. The most commonly seen are made by Campagnolo (though no longer made), but Cobra and Gipiemme also make superb tools.
Most medium-sized and large bike factories have electric and pneumatic power tools made by the Italian companies Marchetti & Lange or Bike Machinery that can do this work, but not with the same precision and care that we wanted to do with fine hand tools. We visited several factories in which the power tools have been extensively modified by the factory technicians to improve the quality of the bikes they produce, but the result is still not as good as hand work.
Many bike factories choose not to do many of the jobs we'll talk about, knowing that the lack of preparation will be hidden by either their own assembly of the bicycle or by the customer's lack of knowledge. Cost is an important factor here as well. When you are buying a bike and considering only cost and the highest value of aggregate parts for the lowest price (what is the cheapest Chorus equipped SLX bike?), these time-consuming and expensive chores are often the first to be ignored. Caveat Emptor, let the buyer beware.
Before brazing, the builder coats each surface to be brazed with a material called flux (usually a white paste). Flux removes the coating of oxides from the tubes and lugs when it is heated during brazing, essential for a good bond between the tubes, lugs and brass. Flux accumulates in hard-to-get-at places like shifter bosses.
When the chainstays, down tube and seat tube are brazed into the bottom bracket shell, brazing alloy (usually a low-temperature brass) flows into the bottom bracket shell's threads. Also, the heat from brazing will slightly change the shape of the shell. Tig-welding causes the faces of the bottom bracket shell to turn up minutely. Before painting and chroming, the frame is sand-blasted. Some small pieces of sand will sometimes remain in the threads. Painting and chrome plating can clog the threads.
As a result, the threaded parts of the frame have to be cleared of brazing alloy, flux, paint, chrome, and sand left from blasting. Although the framebuilder starts with precisely manufactured parts, during frame building these unwanted materials collect in the threads.
The taps used to clean the bottom bracket threads are made to ensure precise alignment from both sides of the bottom bracket shell. Therefore, not only is the the unavoidable debris of frame building removed, any distortion in the bottom bracket threads from heating is corrected.
Bottom bracket threading, width, diameter and other specifications
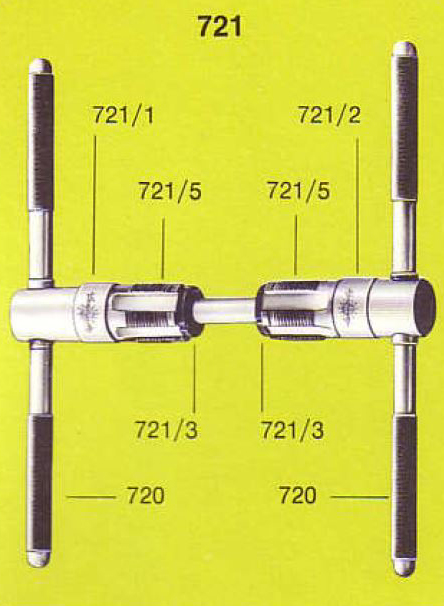
Campagnolo bottom bracket taps. The center rod keeps the two taps aligned.
The shifter bosses are chased with a bottoming tap (an untapered tap) so that the threads of the tap reach the bottom of the threaded hole of the boss. Most painters now mask the shifter bosses before painting. If the bosses have not been masked during painting, and if downtube shifters are going to be mounted, the paint must be very carefully removed from the boss without removing any metal. The precision fit of downtube shifters to the boss, especially friction shifters, requires extreme care in cleaning the boss. Paint and brass in the water bottle bosses is removed with a regular tapered tap.
The derailleur hanger on the right rear dropout must be tapped to clear it of paint and excess chrome.
The last and trickiest bit of this procedure is tapping the small adjuster screw holes in the dropout. Caution must be used when doing this. The taps are small, fragile, and brittle. Every professional mechanic has broken off at least one tap in a dropout. It is awful when this happens because it is so hard to remove the broken parts of the hardened steel tap imbedded in the softer steel alloy of the dropout. Debris from painting and chroming further lock in the broken tap part.
When the builder brazes the seat lug, the heated portion of the seat tube changes shape slightly, preventing a good fit between the seat post and the frame. To fix this, the upper portion of the inside of the seat tube must be reamed with a special cutter to the precise diameter that was called for by the tubing manufacturer.
Different tube sets have different wall thicknesses because the tubing manufacturers use different steels and make tubes for different riders with varying needs. Because with a standard lugged frame, the outside diameter of the tubes remain constant in order to fit industry-standard lugs, the inside diameter (i.d.) varies according to the tubset used. Columbus SL, SLX, EL-OS, Brain, Neuron, and Cromor, for instance, are 27.2mm. i.d. seat tube at the seat lug end. Columbus SP and SPX is 27.0; Aelle is 26.8.
After the reamer is removed, small burrs can stay on the inside of the seat tube. These burrs of steel not only scratch a beautifully polished aluminum seat post but can get between the frame and the seat post and can sometimes cause the post to bind or lock in place. The burrs are removed with a hone on a drill that lightly polishes the inside of the seat tube. Just a little. Too much and the inside diameter of the seat tube will not have the perfect fit we are looking for. The fit between the seatpost and the seat tube should be very precise, allowing a greased post to fit easily without force. When the seat binder bolt is tightened the post should not rock inside the seat tube when force is applied to the seat.
Facing. The frame parts that accept bearing surfaces must be precisely parallel. Cup-and-ball bearing systems that are common on bicycles are very sensitive to minute imperfections and misalignment.
Let's look at the head tube. You've probably turned a set of handlebars on a department-store bike while lifting the front wheel and felt the headset bind at some point in the arc. This is because the various parts of the headset are not in alignment. The usual cause is that the top of the head tube is not parallel with the bottom of the head tube. This problem is fixed with a special tool that does two cutting operations at the same time. The inside of the headtube is machined to the precise diameter which will provide a snug fit for the headset cups. At the same time, the top and bottom of the head tube are machined parallel, eliminating the tendency of the headset to jam. The final operation here is deburring the headtube to make sure no stray pieces of metal interfere with the fitting of the headset.
Throughout the entire prep, a technician must be sure no burrs remain as they move from one job to another. Most of this work is being done on frames with very expensive paint jobs that a stray piece of metal can easily scratch.
Next, facing the bottom bracket. The sides of the bottom bracket shell must be made parallel to each other and perpendicular to the axis of the threads. This job also requires a special tool.
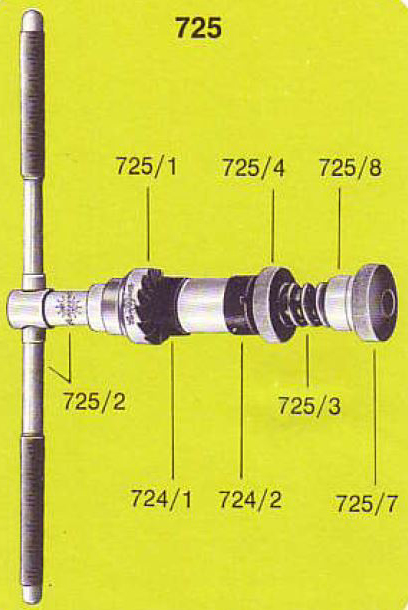
Campagnolo bottom bracket facing tool. Parts 724/1 & 724/2 screw into the bottom bracket and serve as guides for the cutter (725/1) so that the bottom bracket faces are correctly rectified.
Previously the bottom bracket shell was tapped with the threads of each side of the shell having the same centerline. A pair of threaded pilots, each with a hole in the center in the bottom bracket is screwed into the shell from either side until they meet and fit together. The special facing cutter fits perfectly into the center holes of the pilots, and registers off these pilots to machine the sides parallel to each other and perpendicular to the shell's thread axis. If you're sitting on the bike, we want the faces to be both straight up and down, and keying off the threads.
The fixed cup and lock rings have flanges that lock up against the sides of the shell. If the sides of the shell are uneven instead of machined smooth, there isn't enough contact surface area to get the cup to lock on and stay in place. Sometimes, cups that chronically loosen in use will stay tight after facing the bottom bracket shell. Also, there is a little bit of clearance in the threads of the cups and the bottom bracket shell. If you screw a cup into the shell part way, you can wiggle the cup a little because of the space between the threads of the cup and the threads of the shell. If the shell sides aren't parallel to each other and perpendicular to the threads axis, the cups can actually be tipped a little off center as the cup's flange contacts the shell's misaligned side. When this happens, it is impossible to get the bearings to run true. Bottom brackets with spindles that get tight and loose as the spindle turns may have this problem. This is exactly like the cheap headset problem discussed in facing the head tube.
Most bike factories making mid-range and cheaper bikes do not face the shell. Those that do usually do not use the expensive and time consuming tools that register off the threads. They use a tapered holder that fits inside the shell that is moderately accurate. This was not acceptable for our bicycles.
Caution: Once a shell has been faced with good tools, it should be left alone, especially if the frame has been aligned. Even with the most accurate tools available, there is a small variation in the exact plane of each face each time a cut is made with the facing tools. We're not NASA here. There is a limit to the precision possible or necessary in our work. Sometimes, mechanics take a perfectly prepped frame and redo all the work, because "we always do that". If you have a new or uncrashed frame that seems to be straight and true and this reworking is proposed, make sure there is a good reason for the work.
The fork requires precision machining as well. The fork crown race of the headset needs an exact seat on the fork crown. Cutters are made that give the fork crown the right diameter, and make the bearing race line up with the rest of the headset so that the fork won't bind. Lastly, the the fork threads must be checked.
At this point the bicycle can be assembled and ridden, but shouldn't be. We're not done by a long shot.
Frame alignment
Frame alignment has two goals.
First, we want to put the wheels, frame and rider in the same vertical plane, and the axles of the hubs and bottom bracket in planes perpendicular to the rider's plane.
Imagine the wheel-frame-rider plane to be like the vertical tail of an airplane and the axle plane to be the wings. The tail should be straight up and the wings straight out at right angles.
The second basic goal is to put the crank and rear sprockets into proper alignment. When the crank and freewheel sprockets are correctly aligned the bike shifts well and does not waste energy transmitting power to the rear wheel. Modern, short chainstay 20-speed bikes have made this even more critical because of the extreme deformation of the chain as it reaches from one side of the fat rear sprockets to the chain ring.
When the wheels, frame and rider aren't lined up because of frame misalignment, the rider must correct for this by shifting his weight. You have have probably ridden a bicycle with a bent fork "no-hands". You had to shift your weight to one side of the bike in order to make it go straight. A misaligned frame can cause this phenomenon, but perhaps in a much more subtle way, wasting energy because the tires aren't lined up and rolling straight. The tires are crabbing a bit, scrubbing at the ground. Sometimes a small misalignment makes a rider pedal unnaturally, causing hard-to-trace soreness or injury.
Component manufacturers have designed their systems so that the centerline between the front chainrings passes through the center of the rear sprockets. When this is done, the front derailleur is much easier to adjust. Drivetrain energy losses from bad chain line are huge. With proper alignment these losses are easily avoided.
Part one described the carefully machined bottom bracket shell. On a bicycle, all alignment works outward from the bottom bracket shell. The frame is aligned at room temperature, no heat is applied. This is called "cold-setting". It is the goal of a skilled technician to get the frame straight with the least possible cold-setting.
Professional frame alignment is done on a machined flat table with a fixture at one end to hold the frame by the bottom bracket shell. This fixture is machined so that the faces of the bottom bracket shell are held parallel to the surface of the table.

A Marchetti & Lange alignment table. The bottom bracket is clamped at point "A". Picture courtesy Strawberry Cyclesport in Portland, OR. Thanks Andy!
The prepared frame is clamped on the table and the frame is given a quick check to see if it is straight.
In keeping with the goal of minimizing cold-setting, aligners should monk, jiggle and play with the frame on an aligning table to get the best possible initial reading. Sometimes if the frame is flipped over, the frame will give a straighter reading. This is because, despite the use of fine tools in preparing the frame, tolerances in the preparer's work are not high enough to say everything is "dead-on". A very small variation in the shell faces will make a very large change in how the frame reads on the table.
If there is a variation at the bottom bracket shell that raises the edge of the shell up only three thousandths of an inch (a very small measurement for the kind of work we're doing here) the seat tube will be raised nearly fifty thousandths of an inch at the seat lug. This multiplication effect of very small differences is important to remember as we align the frame. Bicycle tool expert Francis Bollag also notes that few human bodies are perfectly symmetrical. This brings about a challenge. We want to make the frame as straight as possible, without going beyond the accuracy of our tools or the needs of our task. More damage is done by obsessive cold-setting looking for those unattainable and unverifiable thousandths of an inch accuracy than by a good, quick, clean job of thoughtful frame alignment. It's a judgement call when to stop.
A note about alignment tools. We used a large plate that allowed the technician to check all parts of the frame at once, to secure the seat lug, and to do all of this without the necessity of moving the frame during the alignment process. This is the most accurate of tools. Checking a frame that has been straightened on large professional table on a small shop plate will often result in a reading that shows the frame to be out of plane and induce needless cold-setting. Yet, for their faults, the result of a shop table is still vastly far superior to not aligning a frame at all.
The majority of alignment work is checked with a tool that has a horizontal "V" cut out of it. This tool can be slid along the table and adjusted up or down so that the "V" will fit right up against the bicycle tube. This allows the technician to find the centerline of the tube, no matter what the diameter. Attached to this same tool is a set of points that can be adjusted to the rear triangle width (130mm is used for road). By clever design, the center of these two points is the center of the "V". The centerline of the tubes can be checked with the alignment of the rear tips with the same tool.
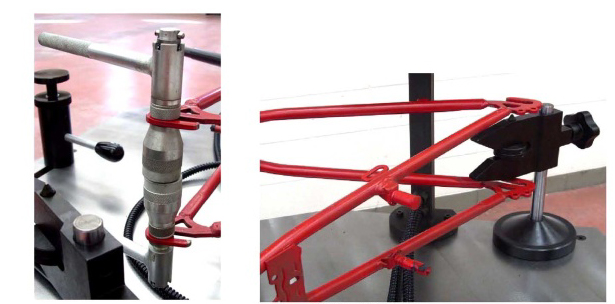
Aligment tools. On the left, where the faces of the two dropout alignment tools meet makes it easy to see when the dropouts are parallel, these are not. On the right, the "V" groove tool. Picture courtesy Strawberry Cyclesport in Portland, OR.
With the frame clamped onto the table, the seat tube is first checked. The "V" tool is brought against the seat tube just above the bottom bracket shell. The tool is then slid to the seat lug end of the seat tube and checked. If the seat tube needs to go up or down, firm pressure is applied in the needed direction. Then the "V" tool is moved back down to the bottom bracket end of the shell and reset because the tube has changed a little at that point as well. The seat tube is then checked at the seat lug end. This continues until the seat tube is parallel with the table. An iron bar is then inserted into the seat tube that precisely fits the seat tube like a seat post. The table has a means to hold this bar in place at the desired height. The seat tube is now firmly held at both ends. The "V" tool is brought up to the head tube and any correction needed there is taken. The "V" tool is slid down to the rear triangle and the preset points that were set at 130mm on the tool are put between the dropouts. If necessary, the rear triangle is brought into line.
Next, an adjustable pointer is placed just inside the head tube at the point closest to the table. The setting on the pointer is noted and the pointer is then placed at the other end of the head tube, also just inside the head tube at the point closest to the table. This is a critical measurement because it reveals head tube twist. Because the error of a small amount of head tube twist is multiplied by the length of the fork, special care must be taken in aligning the head tube. This is done by inserting an iron bar into the head tube and applying enough force to correct the error.
The rear dropouts have to be made straight and parallel to the frame plane. This is an important adjustment for two reasons. First, the rear derailleur is attached to the right dropout and it requires a straight point of attachment to shift correctly. If the jockey pulleys of the rear derailleur are out of plane, energy is wasted dragging the chain through the derailleur. Second, when the dropouts are misaligned, they twist the locknuts of the hub, bending the axle as the quick-release is tightened. Energy is wasted because the hub bearings are not running true. Premature axle failure can often be traced to bent dropouts. If you suffer from constant broken rear axles, have the dropouts checked. Almost all shops have the tools and it's quick and easy to do.
After this has all been done, the iron bar securing the seat tube is removed and everything is checked again from the start. Often, as one part of the frame is brought into line, another part moves out. This process continues until it is determined that the frame is straight.
The dropout adjusting screws are installed. The final and last check we performed was to remove the frame from the table and place a properly trued and dished wheel in the frame. Everything should look good, confirming the evidence the gauges on the table gave.
If you think a bike is showing signs of misalignment, don't strip the bike and have it checked. The first thing to to is to have the wheels checked. Many problems we've seen that might be attributed to frame misalignment were caused by wheels being out of dish. The centerline of the rim should be exactly between the outer edge of the hub's locknuts. All bike shops have a simple "dishing tool" to check your wheels. It's easy and cheap. If the wheels check out, then go on to frame and fork alignment as the possible source of the problems.
Forks are usually checked on a smaller version of the frame table. The fork is held by the steering tube. Fork alignment is checked by placing a machined "spool" that fits in the forks and mimics a hub. A right-angle gauge registers off the top of the fork and then the technician can check all the way around this spool for error. Any resulting error found is corrected.
The frame and fork are now ready for assembly. The reason for buying a high-performance bicycle is efficiency. Every possible watt of energy that the body, sweating and flailing away, makes to turn the cranks should be converted to forward motion. By using care and time, a good techincian extracts every bit of performance possible by making sure that when the frame is delivered to the bike shop, it is as close to perfect as possible.


