
Bottom Brackets and Cranksets
Threading and Other Specifications
Back to index of tech articles

James Witherell's book Bicycle History: A Chronological History of People, Races and Technology is available in both print and Kindle eBook formats. Just click on the Amazon link on the right.
Our story:
A bicycle bottom bracket (often called the "BB" by bicycle mechanics) is the bearing and axle assembly that the crank arms are attached to. The bottom bracket shell is the part of the bicycle frame that houses the bottom bracket. Usually the chainstays, downtube and seat tube are attached the the BB shell.
100 years ago tariffs and the high cost of transport limited European trade. Italian bike makers sold most of their goods in Italy; French makers concentrated on French customers and British makers made bikes for their home market. The result was a hodgepodge of design specifications that can confound the consumer trying to figure out what replacement bottom bracket he needs, especially if it is an older bike.
Chart of Bottom bracket shell specs
An explanation for all these bb types is just below the chart.
The right-hand cup is usually referred to as the fixed cup and the left side is the adjustable cup side.
| BB Name | Threads | Left or adjustable cup threading | Right or fixed cup threading | BB shell width |
Cup outside diameter (O.D.) | Shell inside diameter (I.D.) |
| English | 1.370" x 24 TPI | right-hand | left-hand | 68mm, |
34.6mm - 34.9mm | 33.6mm - 33.9mm |
| ISO | 1.375" x 24 TPI | right-hand | left-hand | same as above | ||
| Italian | 36mm x 24 TPI | right-hand | right-hand | 70mm | 35.6mm - 35.9mm | 34.6mm - 34.9mm |
| French | 35mm x 1mm | right-hand | right-hand | 68mm | 34.6mm - 34.9mm | 33.6mm - 33.9mm |
| Swiss | 35mm x 1mm | right-hand | left-hand | 68mm | 34.6mm-34.9mm | 33.6 - 33.9mm |
| Raleigh | 1 3/8" x 26TPI | right-hand | right or left-hand | 66-68mm | ||
| Chater-Lea | 1.450" x 26 TPI | right-hand | left-hand |
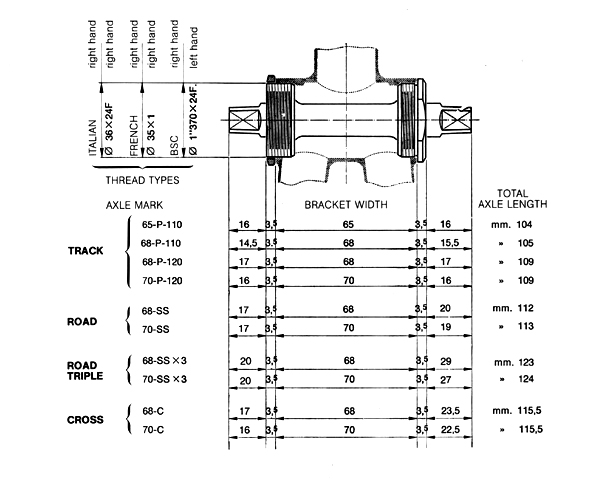
For an explanation of what the above chart means let's start with the classic picture of a bottom bracket shell from an old Campagnolo catalog:

This is a view of the bottom bracket shell from underneath the bike, It is for what is now an older style 3-piece crankset (the crank arms slide onto a steel tapered axle).
BB width:
First of all, note the center measurement, the width of the bottom bracket shell. This usually varies from 65mm to 70mm but in some cases can go to 72mm. Generally Italian road frames have 70mm wide BB shells and British and French use 68mm shells. Track frames can use 65mm shell to pull the arms in a little closer to the center line of the frame to give the pedals a little more clearance on a banked track.
BB threading
There are 3 common basic BB thread types:
English: 1.370" x 24 TPI. This means the hole in the bottom bracket shell is about 1.370 inches in diameter (it's actually the diameter of the cup that is screwed in) and that the threads are spaced 24 to an inch. The right-hand side has left-handed threads. This is because the bearings on the left side rotate counter-clockwise as the crank is turned, putting a constant tightening force on the fixed cup of an English BB (and conversely a steady loosening force on BBs with right-hand-threaded fixed cups). This is the most common bottom bracket specification in the world. The Japanese, Taiwanese and Chinese manufacturers chose to use English bottom brackets. Even some Italian makers build with English bb shells now.
Italian: 36mm x 24 TPI. Both sides of the shell have right-hand threads. The 36 mm diameter is slightly larger than the English 1.370". If you try to insert an English bb set into an Italian shell, it will just slip in. When the threads of an English bottom bracket get stripped, it can usually be be reamed and re-threaded Italian. You still have to use a 68mm spindle, however.
Shimano defines an Italian bottom bracket with a slightly larger diameter than the Italians do. If a bike has been tapped with taps made in Italy, an Asian bottom bracket may not go in. Running Park Tool taps through the BB will make it compatible with Shimano and other Asian company's products.
Some Italian builders use English BBs.
French: 35mm x 1.0mm. The bottom bracket diameter is slightly smaller than the Italian and has one thread per millimeter. Today, French export production generally uses English BBs, but there are millions of bikes out there with French BBs because a lot of the bike boom bikes of the late 60s and early 70s were French.
There are other bottom bracket shells out there:
ISO: 1.375 x 24 TPI. For all intents and purposes, the same as English and often sold as English. It's 5 thousandths of an inch bigger in diameter and is reasonably compatible with standard English-threaded parts. It can cause problems when a bottom bracket is tapped with a set of English taps and an ISO cup that is just a little oversize (products usually vary plus or minus a couple of thousandths) is fitted. Sometimes the cups just won't go in and the shell has to be tapped with an ISO tap.
Swiss: Also 35mm x 1.0mm like the French BB, but the fixed cup has left-handed threads. In the 1970s riders would come back with Mondia or other Swiss-made frames and go crazy looking for bottom bracket parts. This spec can also show up on old Motobecanes.
Raleigh (and other Raleigh brands like Rudge): 1 3/8" x 26 TPI with left handed fixed cup. Unless it has 24 TPI. Generally a Raleigh with a bottom bracket wider than 70mm has 26 TPI and a narrower one is 24 TPI. If you are restoring an old bike you may need a thread gauge.
Chater Lea: 1.45" x 26 TPI. Another old British spec that will turn up most often on tandems.
A traditional bottom bracket has 2 bearing cups that screw into the frame, a right hand, or fixed cup and a left side cup. The fixed cup is the one that goes on the chainring side. It usually has no adjustability. It is installed first and it tightened until the flats on the cup are snug against the bottom bracket shell.
The second cup is the left hand, or adjustable cup. Because component manufacturers have to make bottom brackets that will fit a wide variety of bicycles, built with varying degrees of precision, the left cup is installed last. After making sure that it is optimally tight so that the bearings run freely, without binding, it is in some way locked down.
Bottom bracket shells are made with varying degrees of precision. Even if they were manufactured perfectly, they change shape when heated during brazing. To ensure the bearings run true and the the cups stay tight, the bottom bracket should be tapped and faced. Here is a lengthy explanation of what is involved in preparing a frame to be assembled.
Here are the two common kinds of cranksets a mechanic is likely to come across today:
Cottered steel: Charly Gaul raced with steel cottered cranks long after his competition had switched to aluminum. By the mid 1970s, long after high-performance bike brands and most Japanese makers had switched to aluminum cranks, most European factories continued to equip their bikes with steel cottered cranks. That is a large reason why your current bike is not made in France. Steel cranks are heavy and cottered bottom brackets can be devilishly difficult to work on. A high percentage of the bike boom bikes of the 1970s that so many mechanics are turning into "fixies" came with these cranks.
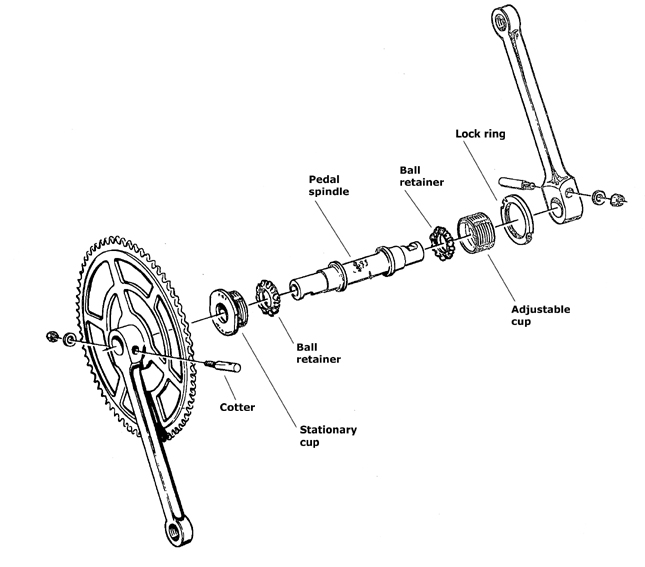
The bottom bracket spindle of a cottered crank has a pair of notches, one at each end. A steel cotter with a tapered flat is placed through a hole in the crank arm, passing over the notch of the axle. It is secured with a nut and washer. The tapers (depth and angle) of the cotters must exactly match so that the arms end up exactly 180 degrees apart. Notice that the cotter for the drive side in the picture is facing the opposite direction of the cotter on the non-drive side. This is essential. Otherwise the arms will notline up.
Less important is whether or not the cotters face up or down (this picture shows down-facing cotters). It is generally thought down facing cotters are more reliable and less likely to come loose.
If a rider uses his bike when a cotter has come a bit loose, it can mushroom inside the arm and require drilling out. Even when everything is correct, a cotter can be very difficult to remove.
There are two ways to remove a cotter, with a press or with a hammer. If you use a hammer, something solid and heavy has to be put under the crank to prevent the pounding force from brinelling (pitting the cups) the bottom bracket bearings. Traditional advice is to use a block of wood, but that will not keep the hammer's energy from being transfered to the bearings and cups. Loosen the nut till it is flush with the top of the cotter (do not remove it) and strike the cotter sharply. If you are lucky, one or two blows will suffice to lossen the cotter and the treds will stil be usable.
The French toolmaker VAR made a cotter remover with a huge lever arm that could usually get a stubborn cotter out, but it regularly ended up mashing the soft cotter. You can use a c-clamp to try to press out a cotter. This will prevent damage to the bearings. A socket placed over the bottom of the crank where the cotter will come out will let you squeeze out the cotter, if you are lucky.
If all this fails, get a drill. Crank cotters are soft and in a few minutes you can get the stubborn cotter out.
Mechanics used to keep bins of various cotters with different diameters and tapers. I have spent long hours filing cotters when the right one wasn't at hand to get the crank arms just right.
When re-installing cotters, press or tap them in, don't use the nut to draw the cotter in. Snug the nut, ride the bike around the block and then re-tightn the cotters. they could be fine for some time to come.
Crank cotter specs:
- English, Japanese, Austria (a lot of Sears bikes were made by Steyr): 9.5mm diameter
- French: 9.0mm
- Italian: Some 9.0mm, but all the Italian bikes I worked on in the 70s needed 8.5 mm cotters with a very deep cut for the taper
Aluminum cotterless 3-piece crank with tapered flats:
Sometime in the 1930s the French company Stronglight developed a superior design that did away with the troublesome crank cotters, the aluminum cotterless crank. Both primitive aluminum metalurgy and industry conservatism prevented the design from being widely used until after the war.
Most racers in the early 1950s used the better design but consumer bikes were spec'd with cottered cranks until the Japanese bikes of the 1970s showed up. Previously cotterelss cranks only came with high-end bikes but brands such as Nishiki and Centurion used them on their entry-level models. Soon all bikes had cotterless cranks.
The axle had tapered flats that fit into the crank arm. The arms were secured with bolts that drew the arms up snug. Removing cotterelss cranks is usually a breeze. A crank puller is screwed into threads in the crank arms and the arm is removed with little muss or fuss.


