Wheel Building:
Part 1:
Lacing Spokes
by John Neugent
Back to list of tech articles | Wheel Building part 2
The late John Neugent probably knew more about bicycle wheels than anyone else. Maybe more about bikes as well. He spent his life in the bike business, at every level. He owned Neugent Cycling, a firm devoted to delivering world-class equipment at the lowest possible price. —Chairman Bill

John Neugent

Les Woodland's book Cycling Heroes: The Golden Years is available as an audiobook here. For the print and Kindle eBook versions, just click on the Amazon link on the right.
John Neugent writes:
This is the first in a multipart series.
When I started building wheels in 1973 there was almost no information on bicycle wheel construction and what was available was extremely confusing so I decided to reason out the logic on wheel lacing.
I will go into tensioning, and other topics in the future.
The lacing solution I came up with has stood the test of time. Unlike other systems which confuse me to this day, mine is simple once you understand the basics.
For this article, I am going to assume you are “crossing” spokes and not doing a radial build. In a radial build you simply run the spoke straight out from the hub to the corresponding hole in the rim.
Spokes can be ½ cross out to about 4 cross. Conventional wisdom is that you need to cross the drive side of the rear hub but Mavic has proven you can also use radial spoking there. Conventional wisdom is that spokes need to be tangent (at an angle to perpendicular) to the hub flange to address the drive load of the sprockets. The same logic is true for disc brakes—which require crossing patterns.
The purpose of this article is to demonstrate how to build a cross spoke wheel—not whether there is any real advantage to any particular pattern.
Filling the hub: When you put spokes in the hub, in almost all cases where you cross spokes, you need to fill the hub with every other spoke (on one flange) going in the opposite direction. When you lay the hub flat—which you will need to do to lace it—this will result in one spoke head being up and one being down.
Lacing: You lace one flange at a time. The spokes on the flange will go into every other spoke hole on the rim. Some rims have holes that are off center and some do not. If the holes are off center lace the spokes to holes that are drilled to that side of the flange. On deep rims holes are sometimes drilled at an angle. Look through the hole to see where it’s pointed. If it’s pointed straight at the opposite side of the rim it’s not angled, if it points outside the rim—that’s the flange side the spokes want to lace to.
I always put a piece of tape (electrical tape works fine) over the valve hole. This is where you start. In rims that have holes pointing to flanges I have always found that the first hole to the right of the valve hole points to the top most flange (the hub is lying on its side).


Content continues below the ads

Figure 1 shows a “pair” of opposing spokes. If you have a 20 hole hub, there will be 10 spokes on each flange. Those 10 spokes will be comprised of 5 “pair.” The red line down the center shows that the opposing two spokes (one head up and one head down) are essentially mirror images of each other.

Figure 2 shows you 80% of what you need to know about lacing a wheel. Use the head up spoke furthest to the right as the first spoke or key spoke. If you are going to do a 2 cross all you need to do is take the second head down spoke and lace it. This becomes your first “pair” and they are laced into the first and third hole on the rim to the right of the valve hole.
Lacing: You will most likely want to lace the spokes. This means the head up spoke will be on top of the head down spoke. This is the traditional method that is supposed to result in a stiffer wheel.

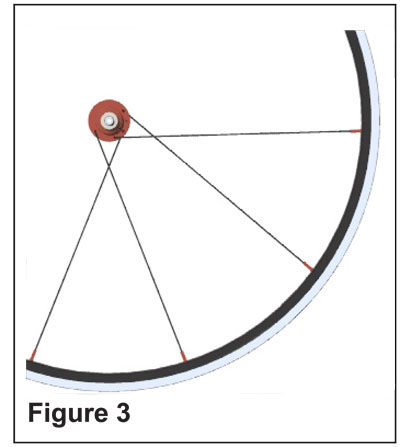
Figure 3 shows the next two spokes to lace. The pair consists to the head up and head down spokes immediately to the right of the original pair.
Content continues below the ads

Figure 4 shows the hub view of figure 3. Essentially you “follow” the first pair all the way around the hub flange by lacing the next head up and down spoke to the next pair of holes on the rim (while keeping in mind you are using every other hole in the rim).
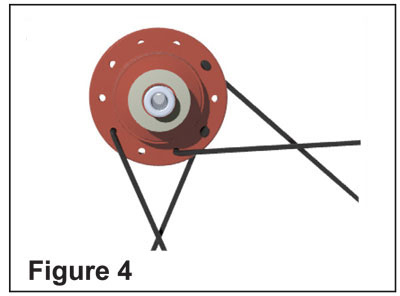
Figure 5 shows two things. The first and more important thing is that you want the valve hole to come out with a much room as possible for the pump head. On low spoke count wheels this is not critical but the more spokes you have the less room there is underneath a cross pair. You do this by starting your first pair immediately to the right of the valve hole.

A less important tradition is to have the hub logo face the valve hole. You do this by starting your first spoke in about the 90 degree position (or 3 o’clock). This will vary slightly with the number of spokes.
Figure 6 shows one side completely laced. The opposite flange is a mirror image with the spokes rotated halfway between the first flange.

Content continues below the ads
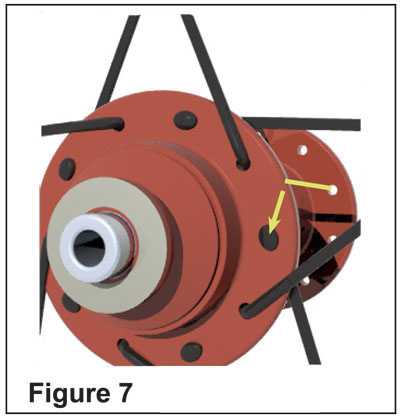
Figure 7 shows the holes on the opposite flange are midway between the spokes in the first flange you laced. The arrow points to the key or first spoke laced. The hole with the yellow line to it would be laced immediately to the right of the first or key spoke. It doesn’t matter if the first spoke on the opposite side is a head up or head down spoke. You create the first pair on the opposite flange by having the second spoke in the pair mirror the first (marry a head up with a head down).
If you are building a rim with a deep section, you can use a spoke to hold onto the nipple to get it through the spoke holes. I like to bend one into a T to make it easier to hold onto.
Future articles will be about tensioning, and spoke, rim, and hub selection.
John Neugent was was one of the first to establish quality hand building in Taiwan around the turn of the century. He now owns Neugent Cycling, a firm devoted to delivering world-class equipment at the lowest possible price.